Best times of day and sky conditions for outdoor pictures

As a photographer who likes to shoot outdoor color images, I don’t get too excited about sunny blue skies in the afternoon. In fact, I whine about them. This is because I consider sunny afternoons to be some of the worst conditions for shooting pictures for several reasons:

  • First, our eyes and cameras see things differently. Our eyes can process more contrast in light than our cameras can. The harsh shadows created by direct sunlight may not look as distracting to our eyes as they will later in our pictures.
  • Second, colors wash out under bright conditions. This is why the three dozen pictures you took from scenic viewpoint highway pull-offs during your summer vacation look hazy and ugly. Overcast conditions, on the other hand, will bring out deeper and richer colors in pictures.
  • Third, patchy light is generally distracting. Our eyes tend to go to the lightest part of the picture. Distracting light spots in the background pull the viewer’s attention away from the subject.

I find the following times and conditions to be much better for shooting outdoor pictures:

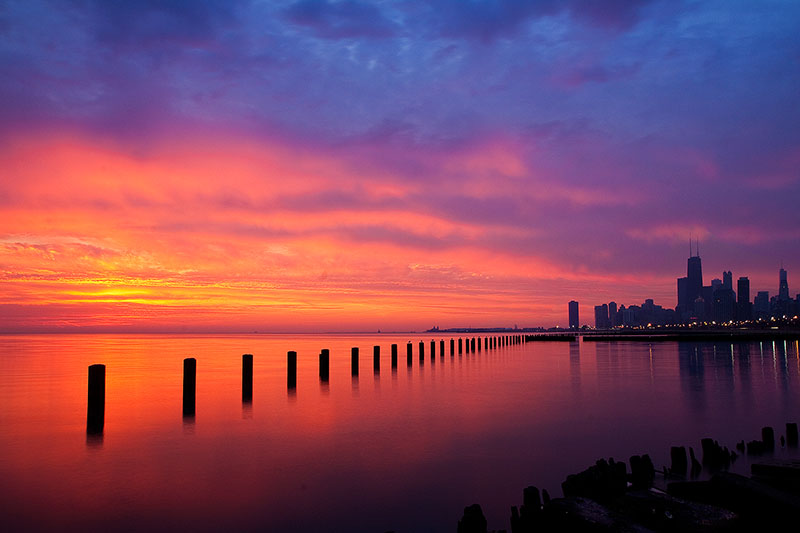
  • Sunrise and sunset. Everyone appreciates a great sunrise or sunset, especially over a landscape or body of water. Notice the warmth of the light in the picture below. You can still get that same warm, angled lighting for a short while after sunrise or before sunset.
america,beach,dress,female,hat,horizontal,indiana,indiana dunes,lake michigan,midwest,north america,sand,silhouette,sunset,united states,us,usa,woman

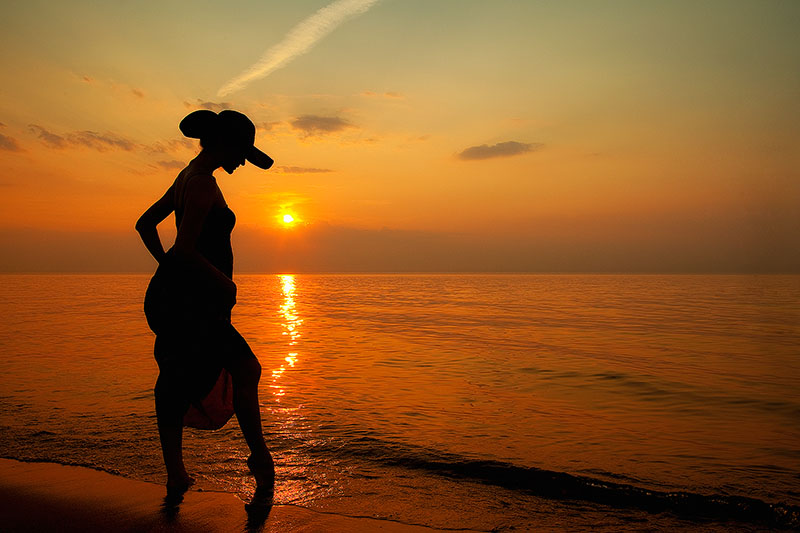
Grace and Beauty : Prints Available

Silhouette of an elegant woman putting her toe in the water during sunset

  • Twilight. Twilight is the time between dawn and sunrise or between sunset and dusk. Depending on the conditions, you usually have around 15-20 minutes during which the sky turns a deep, cobalt blue. This is a great time for city shots. The blue sky looks much better than a black sky which would have been the case 20 minutes after I took this shot.
america,bean,chicago,city scape,cityscape,horizontal,il,illinois,midwest,millennium park,north america,the bean,united states,us,usa

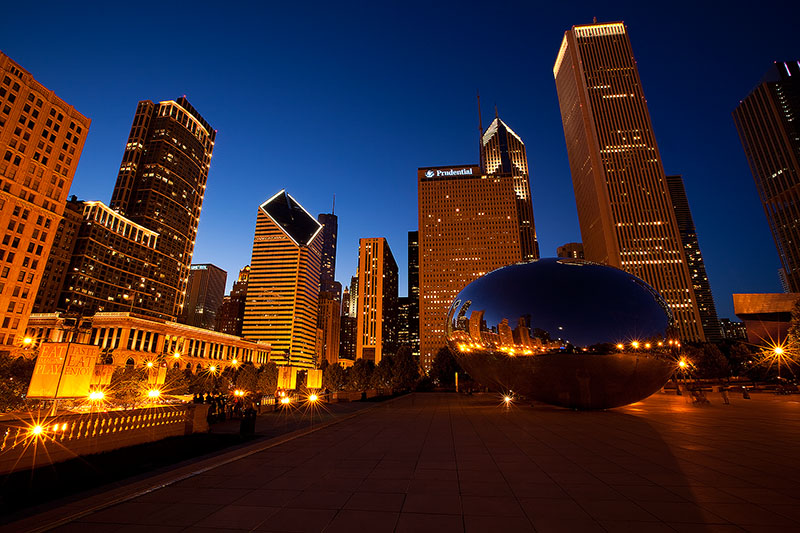
Chicago After Hours : Prints Available

Chicago skyline and the Bean just after sunset

  • Cloudy conditions. Remember, clouds are your friends (sometimes) because they diffuse direct sunlight, eliminating harsh shadows. However, if you are including the clouds in the image, you need clouds with texture, such with storm clouds. Otherwise, you’ll have a washed out white sky in your picture which usually ruins the image. In that case, you are better off excluding the sky from your composition.

Although there are exceptions to every rule in photography, my experience is that the above holds true in most cases for outdoor color images.

Do What It Takes to Get the Photo

Based on the title, you are probably getting ready for some kind of pep talk. Kind of, but not really. This blog is to help give newer photographers some ideas on the types of things they should be doing in order to get great pictures. Here are a few suggestions:

First, get used to laying on the ground or floor. Low perspective creates cool images. I took the next picture while laying on the floor. Don’t be afraid to lie on the ground if it will result in a great photo (yes, even in the snow or dirt).

carnival, celebration, colorful, costume, europe, horizontal, italy, mask, myriam, myriam melhem, palace, party, red, venice

Lady in Red : Prints Available

Gorgeous Carnival model in red inside a Venetian palace

Second, don’t put your camera away in bad weather. Bad weather often leads to cool skies. This picture of the Portland Headlight in Maine was taken during heavy wind and rain. I was sitting in my car waiting for the rain to die down and then realized I was basically being a wimp. So, I got out of the car and got my best shots during the rain storm. I was soaking wet and cold, but still had fun and it was worth it.

america,building,east,eastern,head light,horizontal,lighthouse,long exposure,maine,new england,north america,portland,portland headlight,united states,us,usa,water,water shot

Clouds Over the Headlight : Prints Available

Maine’s beautiful Portland Headlight lighthouse on a cloudy day

Third, get up early. Some of the best lighting happens around sunrise. This can mean forcing yourself out of bed early, often to be disappointed. This shot of Chicago at sunrise was taken on my 8th attempt. I went to that same spot on the lake for seven dull sunrises in the middle of winter in Chicago before getting this amazing sky.

america,beautiful,chicago,city scape,cityscape,horizontal,il,illinois,lake michigan,midwest,north america,red,sunrise,united states,us,usa

Chicago Sunrise : Prints Available

Beautiful red sunrise over Lake Michigan

Fourth, make whatever logistical arrangements are necessary. You won’t get great images by following the crowds of tourists around. This picture below in Namibia took careful research and planning. I had to make sure I stayed at the only lodge which allowed guests to get to the dunes at least an hour before everyone else. Then I had to make arrangements with the lodge for a driver. Then, I be-friended that driver and made sure to be the first one to the dunes and the last one out. I had this amazing place all to myself on several occasions (except for a swarm of very mean bees).

africa,african,dead tree,deadvlei,desert,forest,horizontal,namibia,namibian,sand,tree,woods

End of Day at Deadvlei : Prints Available

Evening light striking the orange dunes at Deadvlei

Fifth, get used to hiking. The image below is of a place known as The Subway. To get to it, the easiest route is about 9 miles roundtrip, mostly spent scrambling over large rocks, walking through streams and climbing up and down small hills. It is tiring (and hazardous) getting there, but an incredible place to photograph. Many of these types of beautiful outdoor locations require effort to get to.

america,autumn,colors,fall,foliage,horizontal,leaf,leaves,left fork,left fork at north creek,left fork of north creek,north america,southwest,subway,swirling,the subway,united states,us,usa,utah,zion

Subway Gold : Prints Available

A flood in the Subway leaves the formerly turqoise pools filled with sand

Sixth (and almost last… trust me), stand in the water. I learned this one from Marc Adamus. If you are doing seascape shots, the better vantage points are usually from in the water, not on the shore. This isn’t always fun. Do remember that salt water kills cameras and also waves and undercurrents can be dangerous. My lawyer made me say that. Okay, I lied. I don’t really have a lawyer. But, if I did, he/she would have charged me $250 to insert that into this post. So, I just saved $250.

cloudy,coast,coastal,north america,northwest,ocean,oceanside,oregon,pacific northwest,pacific ocean,sea stack,united states,vertical,water body,wave

Wave Crash at Oceanside : Prints Available

A wave crashing on the rocky shore of Oceanside, Oregon is frozen in time

Lastly, be persistent! Just fifteen minutes before I took the following picture, my good friend Dusty Doddridge and I were sitting in the car while it was raining sideways. We had checked weather.com and noticed a potential break in the clouds, even though it didn’t make sense looking outside. We decided to take a chance and made the drive. The weather did break for 30 minutes and we got some gorgeous sunset photos. Nobody else was in sight, except a couple frustrated photographers showing up after it was too late. Persistence paid off this time.

america,brilliant,north america,southwest,sunset,united states,us,usa,utah,vertical,watchman,zion national park

Sunset Over the Watchman : Prints Available

Brilliant light hits the Watchman after an intense rainstorm

Focusing Strategies for Moving Subjects

Moving subjects are more challenging to focus on than still subjects. In fact, no focusing strategy will get you guaranteed good focus for a subject moving quickly towards the camera. Depending on the circumstances, there are three strategies I use to focus on a moving subject. These options aren’t available for all cameras. I doubt any point-and-shoot cameras have the necessary features.

One option is to anticipate where your subject will move to, lock your focus on that location (using autofocus lock or manual focus) and then shoot the picture when your subject (hopefully) arrives in the right place. This is a good strategy when it is clear where your subject will be, such as a race car moving around a track. I used this strategy for the jumping lynx shot below. However, because I was laying on the ground and the lynx was jumping up in the air, I had to account for the additional vertical distance. So, I chose a location several feet past the jump-off point of the lynx and focused on that spot in the ground.

africa,african,caracal,cat,jumping,lynx,mammal,naankuse,naankuse lodge,namibia,namibian,vertical

Giant Leap : Prints Available

Caracaol (lynx) jumping to catch a piece of food

Secondly, if your camera has the option, you can use an auto focus mode which continuously tracks a moving subject and keeps it in focus. On Canon, this is called AI Servo. On Nikon, it is called AF-C. After setting the camera to the continuous focusing mode, you hold the shutter down half-way and keep the moving subject over the active focusing point in the viewfinder. The camera will continually keep the subject in focus. I used AI Servo on the cheetah shot below. Check your camera’s instruction manual for full details on this.

africa,african,cat,cheetah,horizontal,mammal,naankuse,naankuse lodge,namibia,namibian

Spots : Prints Available

Close-up of a cheetah in a field in Namibia

Third, for slower moving subjects moving across the scene (rather than towards the camera), I often keep the camera autofocus mode set to the standard one shot (Canon) or AF-S (Nikon) and simply shoot right after locking focus. This is not a good strategy for fast-moving subjects, though.

Natural Looking Adjustments in Photoshop Using Channel Masking

We’ve all seen them… awful, unnatural looking transitions between foreground and sky or subject and background. Light “halos” at the edges which serve as indisputable evidence that you’ve Photoshopped the image. In most cases, quick selections resulting in hard-edged masks are the culprit. Feathering helps, but only so much.

I’ve gotten great results working with a technique called “channel masking” (a.k.a. luminosity masking). Using this technique, I can make natural looking adjustments without even touching a selection tool. This blog is a quick introduction to the technique (and nothing more) and assumes you have at least intermediate skills with Photoshop. The applications of channel masking are pretty extensive. With that in mind, let’s darken a sky.

We’ll start with the following image of Deadvlei in Namibia. I know this blog is not about Deadvlei, but I have to say it… Deadvlei is super cool.

africa,african,dead tree,deadvlei,desert,forest,horizontal,namibia,namibian,sand,tree,woods

End of Day at Deadvlei : Prints Available

Evening light striking the orange dunes at Deadvlei

For this image, I’m happy with the sky as it is, but let’s pretend I’m not. Let’s darken it. With the image open in Photoshop, click on the channels tab as seen in the lower right-hand corner. You’ll see the RGB channel as well as the individual red, green and blue channels.

Screen Shot 2013-03-05 at 7.00.45 PM

You’ll notice I’ve clicked on the blue channel which is now active. The blue areas of the image are lighter in tone, indicating that blue is stronger in the blue channel (imagine that!). The color blue is weaker in the darker areas of the channel. If the red channel was selected, the dunes will appear lighter. Let’s stay with the blue channel because we are darkening the blue sky.

You will recall that, with masks, the lighter areas are more affected than darker areas when making an adjustment. We are going to turn this amazingly detailed channel into a mask that you could never create using any brush or selection tool in Photoshop. To do that, hold down Command (Mac) or Control (Windows) and click on the blue channel layer. The “marching ants” appear around the 50% brightest pixels in the image, as in the following screenshot:

Screen Shot 2013-03-05 at 7.02.33 PM

Now, in this example, I will just keep the 50% brightest pixels selected for my adjustment. However, if you hold Command-Alt-Shift (Mac) or Control-Alt-Shift (Windows) and click again on the blue channel, you will cut the % in half each time you click (1st click means 25% brightest pixels, next click 12.5%, etc). The more times you click, the more your adjustment will be limited to the lightest pixels in the image as they appear in the blue channel.

After your selection is created, click on the layers pallet and create a curves adjustment layer. (We won’t actually be modifying the curve here). Change the blending mode to Multiply to darken the image by one stop. The light areas of the mask are darkened most in the image and dark areas the least. Below is the result, which you can compare to the first image in the blog. Notice the sky is darkened, but the rest of the image is not as affected. No ugly halos. Perfect transitions. You can now adjust the opacity to control the amount of darkening.

Screen Shot 2013-03-05 at 7.07.07 PM

For more control, you can create a new folder with a mask and drop the adjustment layer in that folder. Then, paint on the folder mask to limit the adjustment to the lighter areas of the folder mask. With this image, it would be easy to paint gray or black over the ground to limit or eliminate any adjustment to that part of the image. Also, keep in mind that darkening the selection is not the only option here. You can lighten, add saturation or make other adjustments.

Again, that is just a very brief introduction to the technique. If you want more info on channel masking, you’ll want to learn from a real master. I’d recommend checking out Sean Bagshaw’s video series “Extending Dynamic Range” or “The Complete Guide to Luminosity Masks”.