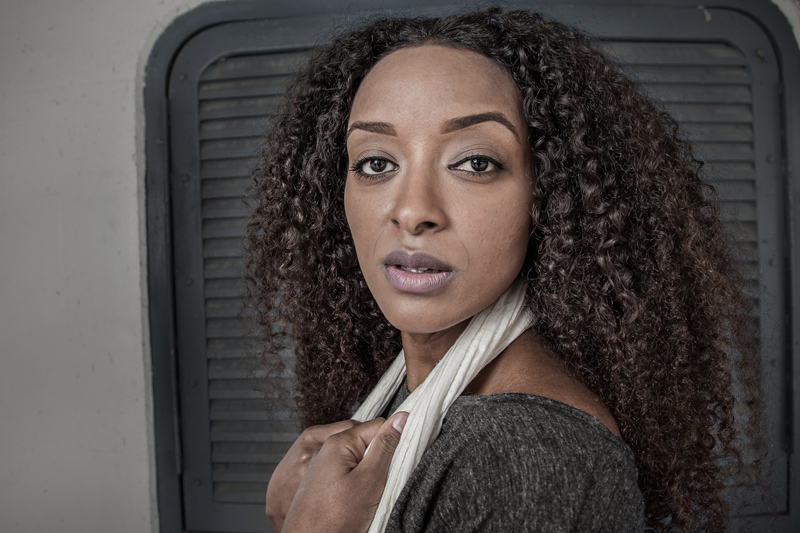
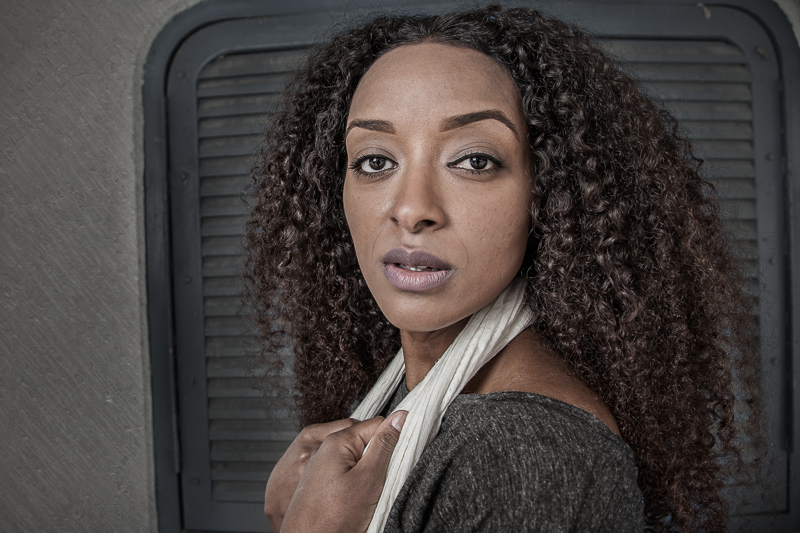
Little things mean a lot in photography. Sometimes a minor modification to a photo can make a real difference. For the image below, I thought it wasn’t quite right. So, I sent it off to a mentor of mine… Indonesian photographer Rarindra Prakarsa… who always has great ideas and suggestions.
Rarindra suggested adding a texture to the white wall, which really made a difference in the image. Below is the before and after:
Portrait of an elegant woman on North Avenue Beach in Chicago
In this blog, I’ll focus on the addition of the texture to the wall. This was actually the first time I’ve added a texture to an image. Here is what I did:
First, I had already taken pictures of textured walls. The one I used was from Venice. You can also buy texture images, but what’s the fun in that? When you take the picture, be sure to have the camera facing straight at the textured surface.
Second, I brought the textured image into the Photoshop file as a separate layer, placing it as the top layer. I added a mask to the texture layer to mask out everything except the white wall. Although a selection tool could also be used, in this case I just temporarily reduced the opacity of the texture layer (so that I could also see the image beneath it) and used a black paintbrush on the mask over everything but the wall.
Third, I changed the blending mode to “overlay”. You can also try different blending modes for a variety of effects, but “soft light” and “overlay” are good options.
Fourth (optional), I added a hue / saturation adjustment and clipped it to the texture layer. I then de-saturated the texture layer.
Fifth (also optional), I added a brightness / contrast adjustment layer and, in this case, reduced brightness and increased contrast a bit.
Sixth, and last, I adjusted the opacity of the texture layer down to around 45%. However, the amount should be based on your judgment of what looks good.
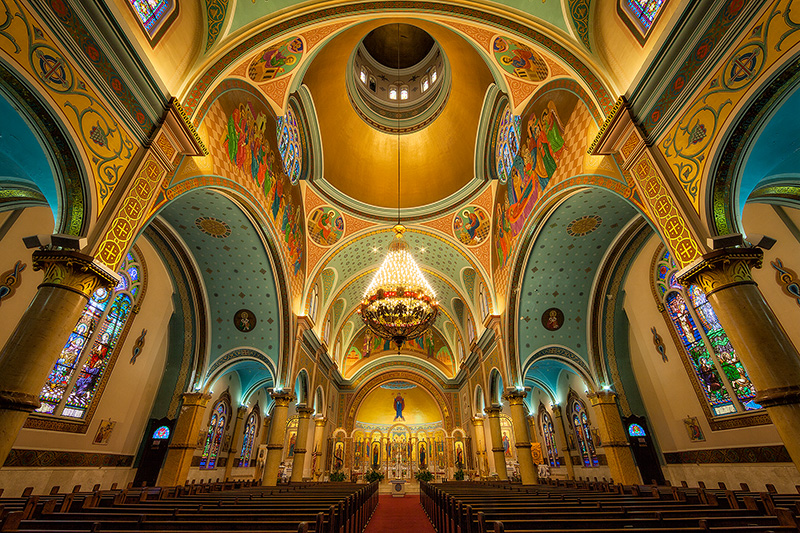
Most of the time, you have a variety of options on camera placement while taking a picture. However, there are certain circumstances where “perfect camera placement” is essential. Even if you don’t consider yourself a perfectionist, it is a good idea to “practice perfectionism” in these cases. Below are a few examples where getting camera placement exactly right made a big difference.
First, if you are going for symmetry in an interior cathedral shot, the camera has to be perfectly centered. Look in the lower right and lower left corner as well as the top of the image and you’ll notice it is perfectly symmetrical. Cathedral shots (or any shot with symmetrical detail like this) have to be taken dead-center. Spend the extra time to get your camera positioned perfectly. One inch to the right or left can ruin the shot.
Interior shot of Chicago’s own Saint Nicholas Ukrainian Catholic Cathedral.
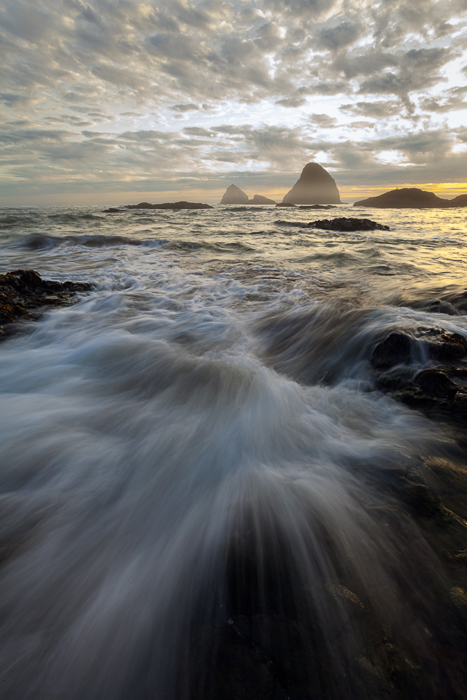
Second, wide-angle lenses with foreground subjects in the composition often require perfect camera placement. Sometimes, the perfect place for your camera and tripod isn’t always the most comfortable location, such as with the shot below. However, in order to get the splash of the wave to be a prominent part of the composition, there was one option for camera placement. Because of the wide-angle lens, moving my camera back a little would have resulted in the wave being a much smaller, and less significant, part of the composition.
A wave crashing on the rocky shore of Oceanside, Oregon is frozen in time
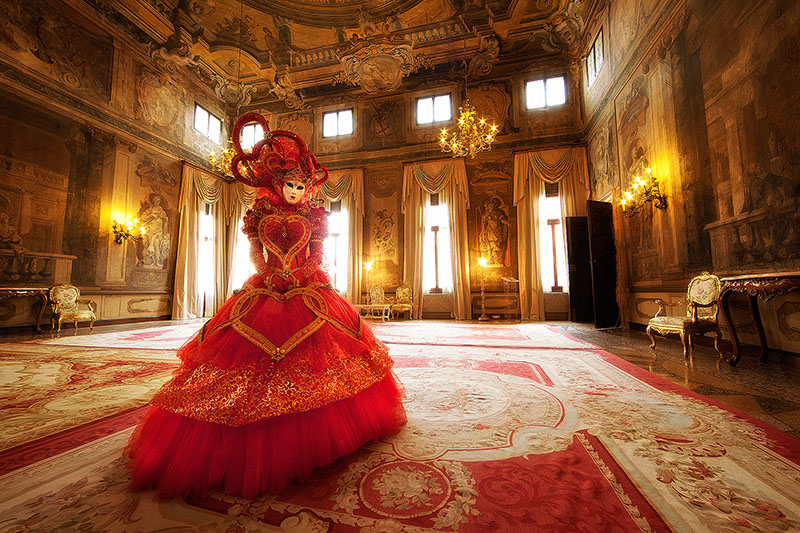
It is Carnival in Venice this week, so I’m using an image from my trip there a few years back as another example. For this picture, there was really only one good spot to shoot from… laying on the floor underneath the piano and shooting up at the model. This made the dress closer to the camera and caused it to distort into a triangle shape. An eye-level shot would not have worked as well in this case. So, it is worth taking your time and trying a number of different perspectives in order to arrive at what you consider to be the best possible camera placement.
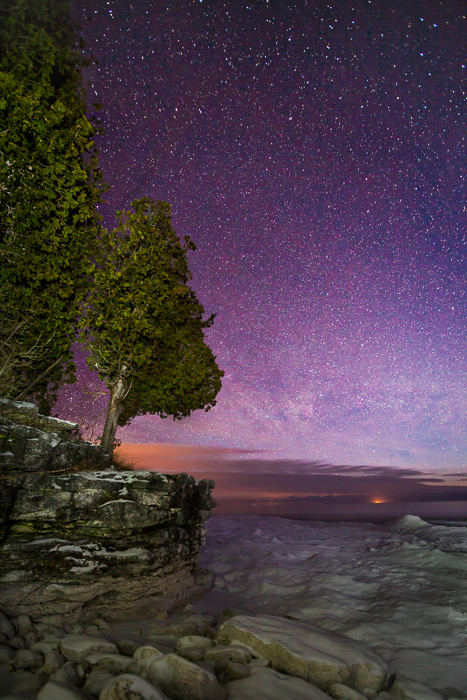
Sometimes the pictures that require the most effort to take end up paying off the most. This was certainly the case for me during a recent trip to Door County, Wisconsin. A friend and I drove through the night, arriving at Cave Point at about 3 am. We then waited for the moon to go down and took some night pictures in the pitch blackness on the frozen beach. The image below was well worth being a little tired and cold for a couple hours.
Stars in the night sky over Door County’s Cave Point in Winter
I’ve had a few people ask me how I took this picture, so I thought I’d put together a quick summary in a blog. I’ll approach this by covering the four concerns I had in mind when shooting, namely 1) composition, 2) focus, 3) exposure for the background, and 4) lighting for the foreground.
Before we start, there are a few conditions that need to be present for night sky images like this. Obviously, you need to be able to see a lot of stars, so no cloud cover is important. Equally important, you need a very dark location away from light pollution. Your backyard will not work. Deserts are ideal, but this remote area along Lake Michigan met “minimum standards” for lack of light pollution. You also want an area with some interesting foreground elements.
Another consideration is the moon. You definitely do not want the moon in front of you as it will be the equivalent of shining a flashlight into your camera. In some cases, having the moon to your back serves to light your foreground as you shoot, which might be a good thing. In our case, we waited for the moon to go down and had a couple hours to shoot before sunrise.
Now, for my four main concerns while taking this shot:
Composition – It is easy to get sloppy in composing night pictures. This is because: a) it is tough to set up your composition in the dark; and b) it is easy to just focus on how great the stars look. However, a compelling composition, including an interesting foreground, makes all the difference. If possible, you can set up your composition on your tripod while it is still light. In my case, we didn’t arrive until the middle of the night, so I used “live view” in my Canon camera and then shined a flashlight around the foreground to determine my composition.
Focus – You will generally be using a wide angle lens for night pictures that include a foreground element and the sky. So, there is a good chance that focusing on your subject will mean focusing on infinity. To focus, I used a flashlight on the subject and used auto focus, zooming in using live view for the most accurate focus (message me if you want advice on how to do this). Then, I switched off auto focus.
Exposure for the Background – After getting my composition and focus set, I next made sure that I got a good exposure for the background, namely the stars and the horizon. Although the horizon looks a bit like a sunrise here, it is actually light pollution from across the lake.
I first set my camera to Manual, opened up the aperture as wide as possible (in my case to 2.8) and set the shutter speed for 30 seconds. If you are using a wide angle lens, you don’t want to go above 20-30 seconds or you start to get star trails (even shorter shutter speeds are necessary when shooting telephoto). Then, I adjusted the ISO up high enough so that the stars became visible and the highlights on the horizon did not get blown out. So, my settings here were ISO 2500, f2.8 and 30 seconds. I used in-camera noise reduction because of the high ISO.
Exposure for the Foreground – I was literally in pitch blackness as I was shooting. The foreground subjects had no light on them. Although foreground silhouettes look good in some cases, I thought a lighted foreground would look much better. Had I gotten there much earlier, I could have set up my tripod and taken a picture before it got dark… then blended the foreground with the night sky in Photoshop. However, in this case I lit the foreground with a flashlight during the 30-second exposure.
Basically, you just need to experiment. Because the ISO was high, it only took a little light before the foreground would get too bright. I took 6 or 7 pictures until I got the foreground lighting how I liked it. I found that using the “edge” of the flashlight’s beam (not the center) and moving the flashlight around very quickly and only for a second or two worked the best. You want to avoid hot spots in the image. You are better off with a less powerful flashlight in this case. Practice makes perfect here.
Processing – Post-processing was critical in this image. In a few weeks, I’ll be traveling to Death Valley (I can’t wait!) and plan on shooting some additional pictures of the night sky. After that trip, I’ll post an additional blog on processing night pictures like the above image and show you the results from that trip. Stay tuned!