An Introduction to Shooting the Night Sky: Part 1 – Milky Way, Stars & Northern Lights

2016,May,Spring,cyprus,europe,hills,horizontal,italy,landscape,milky way,night,rolling,san quirico d'orcia,star,star trail,stars,trail,tree,trees,tuscany,wheat fields

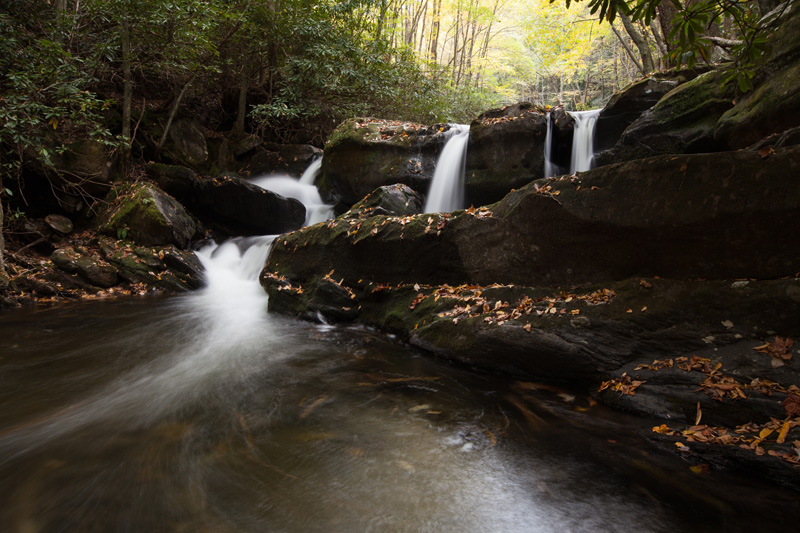
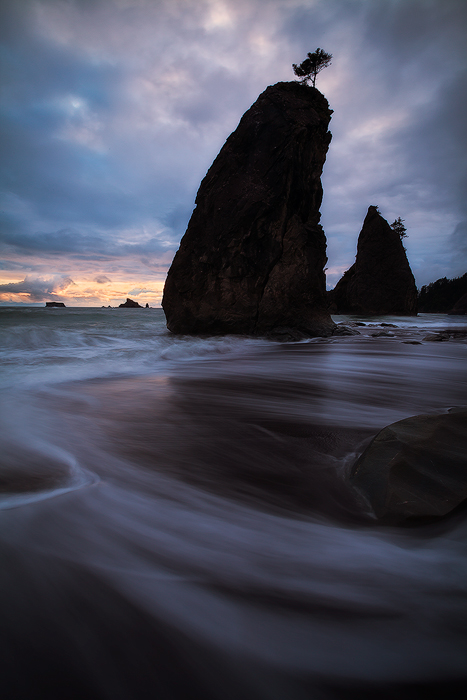
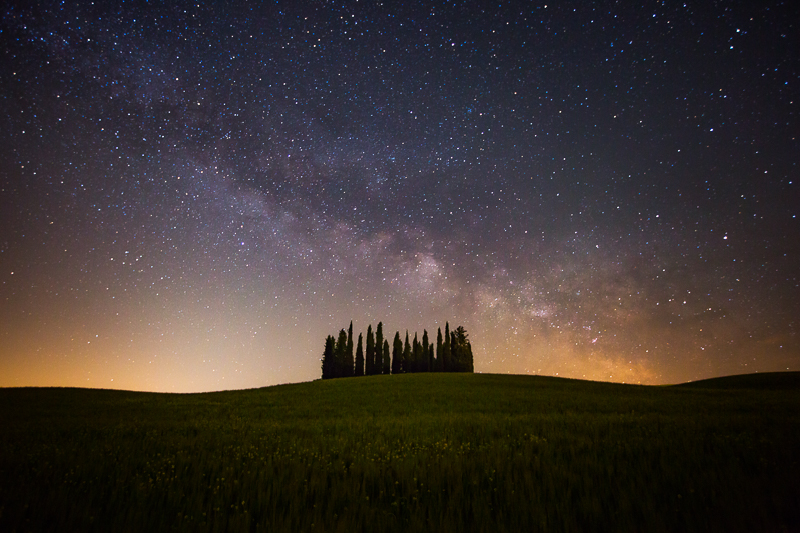
Night Sky Over Tuscany : Prints Available

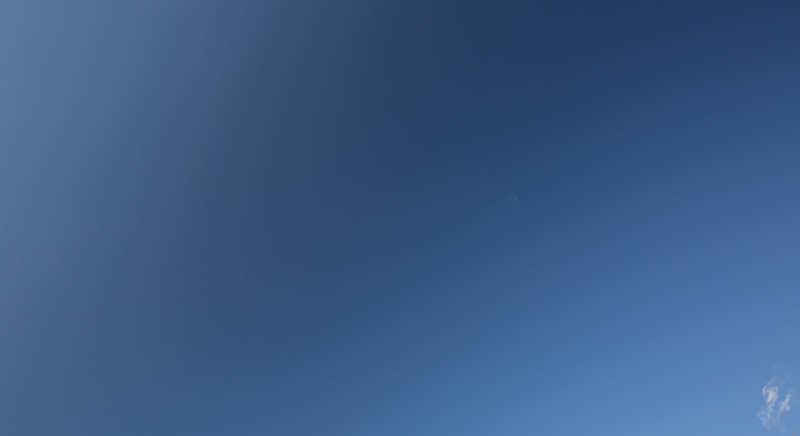
The Milky Way makes an appearance over the hilltop in a field in Tuscany, Italy.

A good night’s sleep is an important part of a healthy lifestyle, right? Getting adequate sleep not only positively impacts your mind, heart and mood, but also helps you look better. However, Milky Way and Northern Lights pictures are really, really cool. So, like many other photographers, I sometimes ignore the advice of the health experts and skip a night or two or more of sleep in order to bring home some killer images. In fact, I’ll be doing that again next week.

Disclaimer

Let me start with a disclaimer. There are books, blogs, videos and long articles dedicated solely to night photography. This article is only an introduction to pique your interest and help get you started. By all means, do some more reading. Also, I’ll do a Part 2 article on “Processing” in next month as it is a topic in and of itself. Star trails also warrant a separate article, so that will be Part 3. With all that in mind, here is some advice on getting started with shooting the night skies.

Shoot in a Remote Location

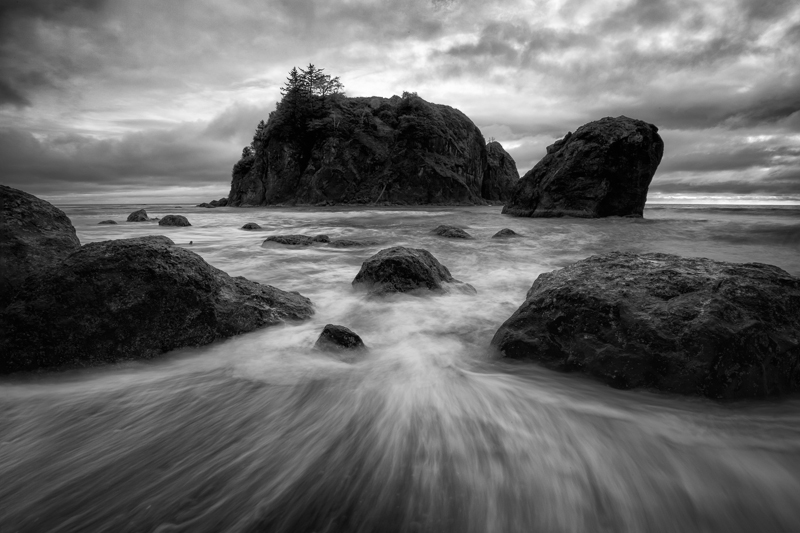
At night, there is “dark” and there is “DAAAARK”. You want the latter. This means shooting in an area far away from the lights of towns and cities. Otherwise, the light pollution can wash out your sky and end up dominating your horizon. The site http://www.lightpollutionmap.info/ has a map that shows light pollution around the globe (i.e. places to avoid).

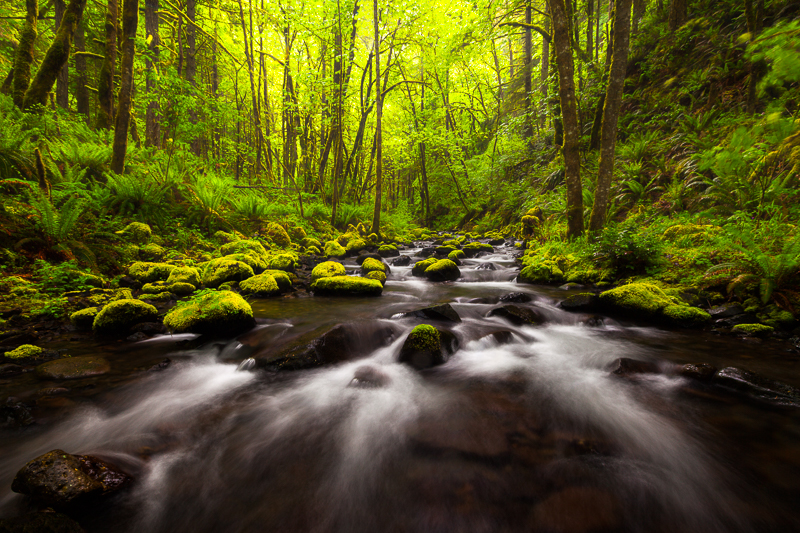
However, all is not lost if there is a town in the distance. In fact, in many cases, I think the light pollution looks good. In the cover photo of the trees in Tuscany, I think the light pollution adds to the image by providing a nice warm glow to complement the cool night sky. Distant, minimal light pollution behind you can also help light foreground elements during your exposure. Ideally, shoot in an area with dry, clear air. Deserts and places of higher elevation work well.

Timing Issues

There are a lot of timing issues to get right for night photography. You have to know what cycle the moon will be in, when the moon’s light no longer impacts the sky that night, and (possibly) whether the Milky Way will be visible. Of course, you have to worry about clouds, too, but those are less predictable.

Moon Cycles

Having the moon in front of you while shooting is similar to having someone shining a flashlight into your lens. It will create a bright spot in your image while also washing out the stars. Because of this, you need to be aware of moon cycles. Ideally, plan your shooting during the New Moon, which is the moon’s first cycle during which it is hidden from view. You’ll have nice, long periods of complete darkness during this time. You can also get by with up to 25% moon (about 5 days before or after a New Moon), so targeting that time period is workable.

Time of Night

If the moon is visible at all in the sky on your shooting nights, then you will want to aim for a period of the night called “astronomical dusk,” which is the point at which the moon has no impact on the brightness of the sky… the sky has reached maximum darkness. This is generally 1 1/2 to 2 1/2 hours after sunset and the same amount before sunrise. However, start shooting before complete darkness to get a bit of faint light on your foreground and a nice blue in the sky. The stars will not be as pronounced during this period, but it is good to have shots from both time periods, especially if you are blending a separate foreground shot in during processing.

The well-known program “The Photographer’s Ephemerus” (http://photoephemeris.com/) is a good resource for showing the window of timing you have to work with for your date and location so that you are not stuck staring at the moon wondering when it will get out of the way.

The Milky Way

Although shooting a sky full of stars is fun and can lead to a great image, the core of the Milky Way is the money shot. Capturing the Milky Way’s core takes some planning, however. You can do a Google search to find out where and when it will be visible. Or, PhotoPills is an iPhone application for identifying when and where in the world it is visible, as well as what angle it will be at during certain times of the night. There are also night sky maps available on Amazon. Whatever you do, plan your trip around Milky Way visibility and the moon cycle.
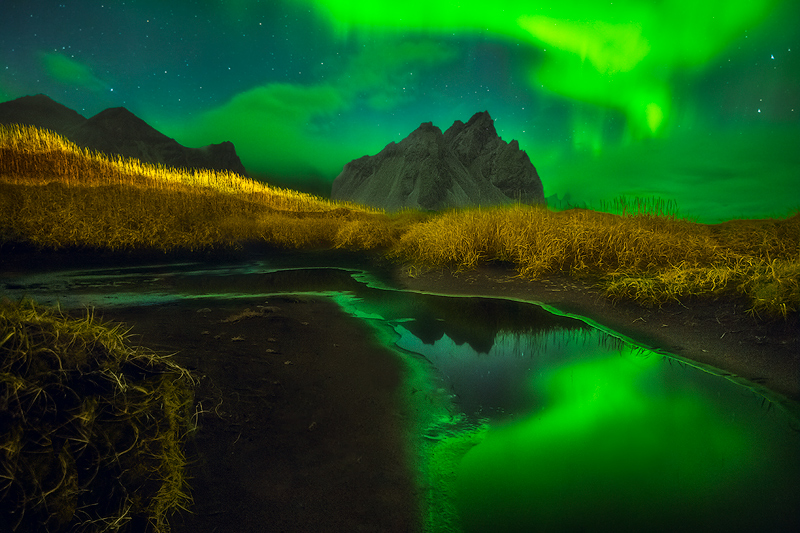
The Aurora Borealis

europe,iceland,kirkjufell,mountain,night,northern lights,peak,snæfellsnes,stream,water body,waterfall,western,snæfellsnes

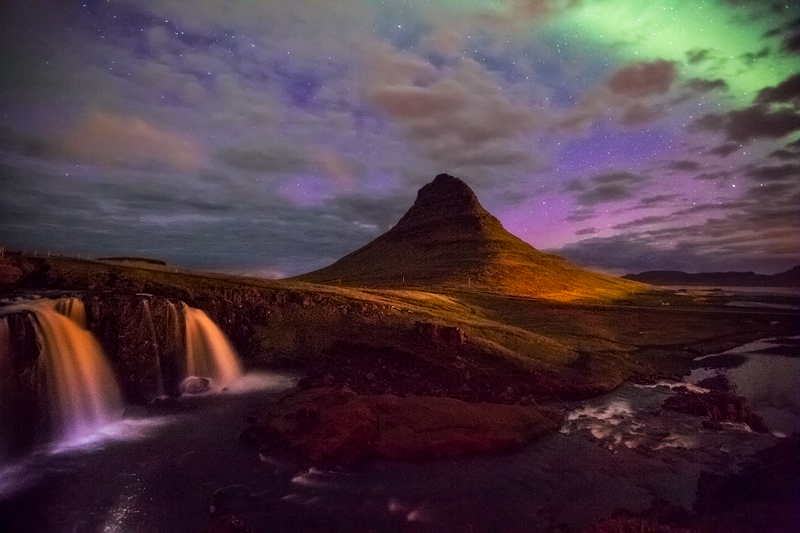
Aurora Mountain : Prints Available

Iceland’s Kirkjufell with the faint glow of the Aurora Borealis behind it.

Photographing the Northern Lights is an absolute blast. As you know already, you have to be pretty far north to capture the Aurora at its best. You generally have to brave the Winter months in places like Iceland, Alaska and Scandinavia to get the best chances. However, all three Aurora shots in this article were shot in Iceland in mid-September.

There are Aurora sites on-line that predict Aurora activity, such as http://www.aurora-service.org/aurora-forecast/. Some of these Aurora forecast sites are location specific, so do a search to see if there is one for your location.

Weather Conditions

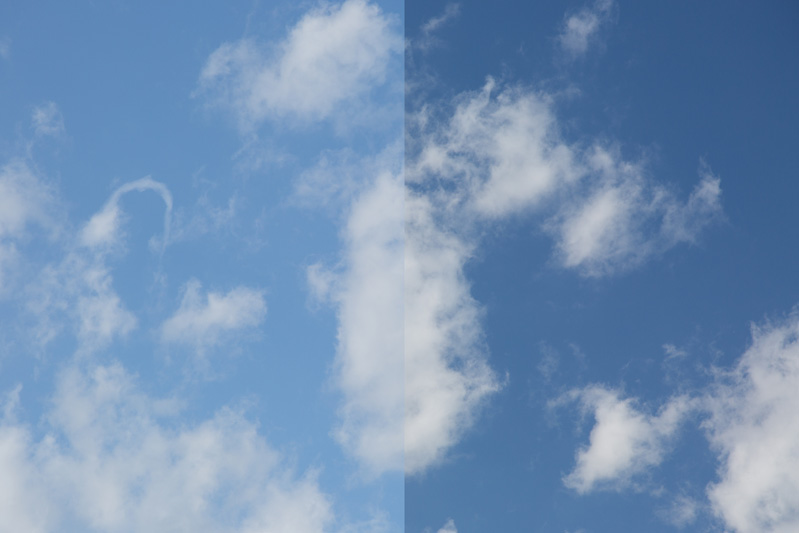
While a clear sky is usually a disappointment for landscape photography, it is great for night photography.

  • For Milky Way (or single point stars in the sky), you need the sky to be completely clear overhead. The header shot of the Milky Way over the trees in Tuscany includes some low clouds along the horizon, but nothing blocking the Milky Way. A few minutes after this shot, the clouds started covering the galaxy and I left.
  • For pictures of the Northern Lights, some scattered clouds are okay and can even add interest to the image.

On the subject of weather, remember that dropping temperatures can lead to foggy lenses, particularly if the area is damp. As you are shooting in the dark and sometimes cannot turn your flashlight on without upsetting other photographers, it is easy to overlook a lens that is fogging.
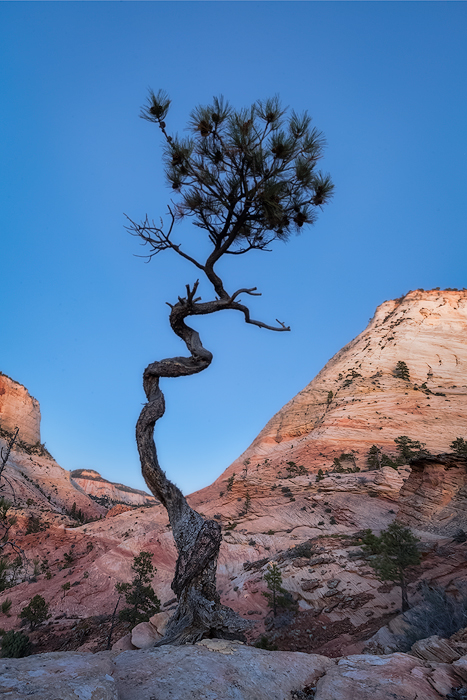
Foreground Subject

The night sky is not a subject, but a background. So, you still want something interesting as a foreground element. If you will be letting your subject go dark as a silhouette, then the subject’s shape is extra important. If you want your subject lit, then there are a few options:

1. Light pollution from distant cities behind you can help provide enough lighting to illuminate your foreground subject.
2. You can “light paint” your subject with a flashlight or other light source. However, if you haven’t done this before, it takes some practice to get subjects lit evenly.
3. As mentioned, you can also shoot your subject before things go completely dark and just leave your tripod in the same position for the shot of the sky. For this option, I recommend shooting several images as the sky darkens. Start at twilight and then try a few more as time goes on, adjusting your settings as necessary. Although you will get the best quality image at twilight (with a lower ISO), sometimes the subject at twilight does not look natural when blended.

central,europe,iceland,landmannalaugar,mountain,northern lights,volcano

Aurora Dance : Prints Available

Amazing Northern Lights dancing over a meadow in Landmannalaugar

Equipment

At night, the higher end camera equipment really shines. Ideally, you’ll want:

  • A camera that can shoot at high ISO without much digital noise.
  • A fast wide-angle lens, such as f/2.8 or faster. An f/1.4 prime lens is ideal. I just bought the Rokinon 24mm f/1.4 for this purpose. The wide aperture allows you to shoot at much lower ISOs. To illustrate, if your lens is at f/1.4 and your targeted shutter speed requires an ISO of 800, shooting at f/4 would require an ISO of 6,400. In the world of ISO, that’s a world of difference.
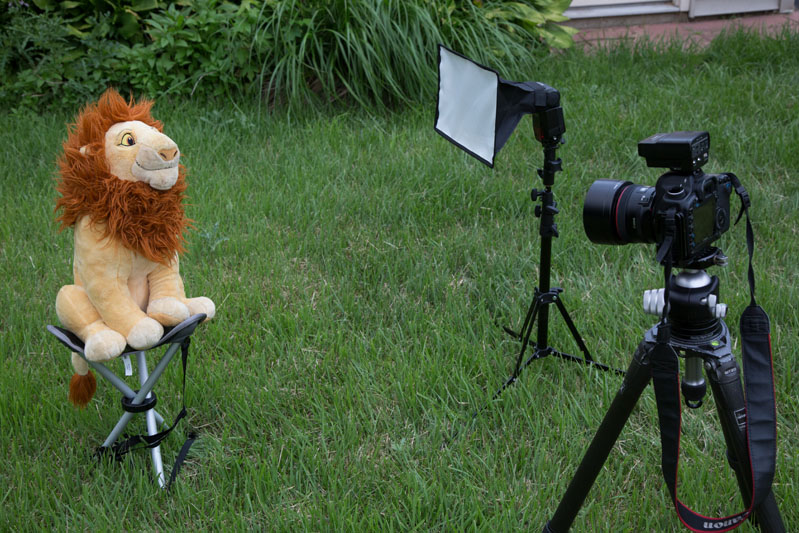
  • A sturdy tripod that stays stable when the wind is blowing.
  • A remote trigger… get an intervalometer if you plan on also shooting star trails.
  • You’ll need two sources of light, such as a headlamp and flashlight.
  • Bring layers of clothes for changing temperatures.

Settings

For the Sky Shot

  • Manual Mode & manual focus
  • Long Exposure Noise Reduction off
  • Aperture – Shoot at the widest aperture of your lens. Or, if you have a very fast lens (like f/1.4), try also shooting at one stop above the widest setting (f/2) as it will be a sharper aperture. You’ll need a higher ISO, but you can compare quality when back at your computer.
  • Shutter Speed – Stars – The rotation of the earth will start to streak the stars at some point. To avoid this, use the “500 Rule” by dividing 500 by your focal length. If your focal length is 16mm, then 500/16=31 seconds. Round it down to 30 seconds, and for good measure, you should lower the shutter speed a bit more, down to 20- 25 seconds. Using the same method for 24mm, 500/24=21 seconds, but use 15 seconds.
  • Shutter Speed – Northern Lights – In my opinion, Aurora images look their best at between 6 and 25 seconds, depending upon the brightness of the Aurora and how fast it is moving. I like some detail in the lights, as opposed to a big blur.
  • ISO – The ISO is then set to get a proper exposure. ISO’s of 1600-3200 for the sky are common. When setting your exposure, you don’t need or want every single star in the sky to be visible.

For the foreground subject

  • Shoot the foreground separately (re-focusing if necessary) at a lower ISO and, therefore longer shutter speed. In Part 2 of this article, I’ll discuss blending the two images in Photoshop.
aurora,borealis,center,central,europe,hill,iceland,interior,landmannalaugar,mountain,northern lights,the northern lights,volcano

Reflection : Prints Available

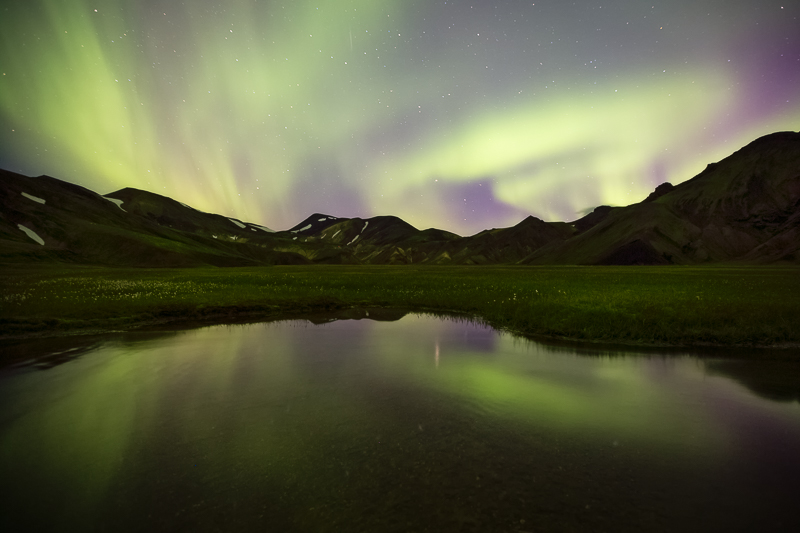
Northern lights over a small pond in Landmannalaugar

Composing

It is ideal to compose while it is still light out. If you are composing or re-composing in the pitch blackness, a time-saving strategy I use is to crank up the ISO to maximum just to get my composition right. This helps me avoid waiting through long shutter speeds. Then, I reset my ISO and shutter speed to the desired amounts for the actual shot.

Focusing

If your foreground elements are closer than your lens’ infinity focal point, you will want to focus on your subject and the sky separately and take two shots. Focusing in the dark can be difficult, but here are some ideas:

Focusing for the sky – Use Live View to zoom in (using the zoom buttons for the LED screen) on a distant light or star. If this cannot be done, then you can walk a flashlight past your lens’ infinity point. (Optical infinity is too big of a subject to go into detail on here.) If you don’t know the infinity point of your lens, some photographers simplify this by saying to convert your focal length to feet and use that distance. So, for a 24mm lens, walk out at least 24 feet, leave the light there, come back and focus on it for your infinity focus.

Focusing for a closer subject – If you are shooting a closer subject that is not in focus considering your aperture / infinity point, you will need a separate focal point for the subject. You can shine a bright flashlight on it and focus using Live View.

Processing

As mentioned earlier, watch for Part 2 next month on processing night sky images, as well as a separate article on star trails in a future blog.

How to Expose for Flash and Existing Light Separately Using Your Camera’s Controls

asia,asian,bali,east java,female,girl,indonesia,indonesian,java,lady,lake,mega,names,sanur beach,water body,young

Indonesian Girl at Sunrise : Prints Available

Beautiful girl carrying a pot of water on a beach at sunrise

Flash photography can be intimidating. Adding artificial light to the existing light in a scene and getting a proper balance between the two requires some basic knowledge and skill on the part of the photographer. If you are not yet experienced using flash, but have an interest in giving it a try, an important first step is understanding how to control exposure of the light from your flash and the existing light (a.k.a. ambient light) separately using your camera’s and flash’s controls.

You probably already have a good understanding of how to control shutter speed, aperture and ISO to arrive at a proper exposure when flash is not being used. Let’s look at how these three variables, as well as your flash’s output, come into play when you are adding artificial lighting to the scene.

Introducing Leon the Lion

It’s been awhile since I’ve been on safari and I’m missing it. So I thought I’d borrow Leon the Lion from my daughter’s room and pretend I was back in Africa. My settings here were ISO 400, 1/50th second and f/8. I shot in manual mode. No flash yet.

1 - ISO 400 f8 1-50 No Flash

Next, I added the off-camera flash. I used manual mode on my flash and fired it through a small soft box at 1/32nd power. The image below is our starting point for an exercise to learn how your camera and flash controls affect how much flash and ambient lighting end up in your image.

2 - Add Flash 1-32nd

Shutter Speed

Changing your shutter speed won’t affect the amount of flash lighting that ends up in your image. This might be surprising to you, but it makes perfect sense. Here is why:

The flash has to fire while the shutter is open. Your camera will have a “maximum sync speed”, which is the fastest shutter speed whereby that can be accomplished. Usually this is around 1/200 of a second (I’m ignoring “high speed sync” for now). Even at full power, the blast of flash happens faster than your maximum sync speed. So, the same amount of flash will illuminate Leon when we reduce the shutter from 1/50th to 1/100th second. Here is the image after the shutter speed change.

3 - 1-100th

Notice that the flash lighting on Leon appears mostly the same as with the original settings, even with the adjusted shutter speed. However, the background has gotten darker. So, using shutter speed, we’ve just controlled the ambient light background separately from the flash-lit subject. There was some ambient light hitting the subject, in addition to the flash, so we don’t have complete control over the separate light sources. But you can see that we have considerable control here.

Aperture

Now, let’s reset our settings back to ISO 400, 1/50, f/8 and 1/32nd flash power. This time, let’s adjust only the aperture. Staying with this idea of cutting the light in half, let’s adjust the aperture by 1 stop from f/8 to f/11.

4 - f11

Notice that both the flash lighting on Leon and the background lighting went darker than with the original settings. So, the aperture controls both the amount of flash lighting and existing lighting in the image. But wait… there’s more to say about aperture….

Shutter Speed and Aperture Together

With the above aperture adjustment, we left the shutter speed alone. However, we could have made two adjustments, one to aperture and one to shutter speed. Remember, shutter speed does not affect your flash lighting. Here is how you can control each type of lighting separately using a two-step process:

  • First, we get the desired exposure on the flash-lit subject by adjusting the aperture. This also affects the background exposure, which might not be properly exposed yet, but that’s okay.
  • Second, we adjust shutter speed for the background exposure only, without affecting the flash-lit subject.

With these two steps, you essentially control the flash exposure with aperture and the existing light exposure with shutter speed.

What about ISO?

Because your ISO controls the sensitivity of the sensor to all light, it is similar to aperture in that it impacts the amount of both flash and ambient light in your image. To test this, let’s reset our settings to the initial settings of ISO 400, 1/50, f/8 and 1/32nd flash power. Now, let’s reduce the ISO from 400 to 200.

5 - ISO 200

Notice that the aperture adjustment and ISO adjustment look basically the same as both halve the light on the entire image. This means that you can use ISO in a similar way that you can use aperture. However, with ISO, the lower the better in terms of image quality. So, I keep my ISO low. Fortunately, there is another variable we can adjust to control the power of the flash… the flash itself.

Flash Power and Placement

I always shoot off-camera flash in my flash’s manual mode. My Canon flashes can be fired at full power (1/1), 1/2 power, 1/4 power, 1/8, 1/16, 1/32, 1/64 and 1/128. Each of these steps cuts the flash power (the duration of the flash, actually) in half. I have the flash set up to allow further tweaking in 1/3 stop increments.

Let’s reset again to our initial settings of ISO 400, 1/50, f/8 and 1/32nd flash power. Here is the original image back with the original settings.

2 - Add Flash 1-32nd

Now, let’s halve the flash power from 1/32 to 1/64, as shown in this next image.

6A - 1-64th power

As expected, this adjustment mostly leaves the background alone, but reduces the impact of the flash on the subject. You may have some flash hitting the background which will still be affected by adjustments to flash power.

You can also control the brightness of the flash on your subject by moving the flash closer or farther away, changing the angle of the flash, or adding/removing a diffuser. However, these adjustments all change the nature of the light, not just its power. So, don’t use this method to adjust the power of your flash.

Summary

Here is what we’ve covered:

  • Adjusting the shutter speed affects the exposure of the ambient light, but not the flash.
  • Adjusting aperture impacts the exposure of both the flash-lit subject and background.
  • You can first use the aperture to control the amount of flash lighting in your image and then adjust shutter speed for the ambient light without impacting flash.
  • Changes to ISO have a similar impact as aperture. Image quality is an issue to consider.
  • Adjusting your flash’s power controls flash output without affecting ambient light, except for flash that spills over onto the background.
  • Positioning and diffusion of the flash should be used to control the nature and quality of light, not the power of the flash.

Try This at Home

You can use this article as the basis of a lighting exercise that you can try at home. Below is the basic set-up I used.

7 - The Setup

Now, if you decide to use a stuffed animal like I did, my suggestion is to not let the neighbors see you doing this. The basic idea is to get an initial decent balance of flash and ambient light using the controls outlined in this article and then to modify each of the variables to see their impact on the lighting. It is the modification of these variables that is the important thing here, so don’t worry about getting a perfect exposure.

Start without the flash to get an initial exposure, then bring it in and try to balance it with the ambient light. You’ll want to work in manual mode on both your camera and your flash. Try it out in dimmer light, bright light, and even indoors. I shot fairly late in the day in cloudy conditions, so my settings will reflect somewhat dimmer outdoor lighting.

Good luck!

How and When to Use a Circular Polarizer

0W6A4487-Edit

A must-have filter that cannot be replaced with post-processing is the circular polarizer (a.k.a. CLP). Polarizers absorb polarized light, which has some serious benefits for photographers. These include:

1. Cutting Down Non-Metallic Surface Reflections

For me, the most important feature of a CLP is the filter’s ability to cut down reflections. In landscape photography, this means that reflections on water, wet rocks, wet leaves and even dry rocks and leaves can be cut down and often eliminated altogether. This is extremely important since the reflections essentially replace detail and saturation with ugly shiny spots on your image. This can ruin your otherwise colorful scene. Just take a look at these next two images to see exactly what I mean.

IMG_4294

Without CLP

IMG_4295

With CLP

By rotating the circular polarizer, the reflection in the foreground is removed. What might not have been as immediately apparent is how the leaves in the background look more saturated. This is because leaves are reflective. Cutting through this reflection allows more detail and saturation in the background trees to come through. However, sometimes you want a certain amount of reflection in your shot. You can control this by simply rotating the polarizer. With wide-angle lenses, it is a delicate balance to get a desirable amount of effect in as much of the scene as possible.

As we’ll see in the next section, the direction of light is very important for a CLP in certain cases. However, if you are in overcast conditions and not including the sky, then the angle of light is not really an issue in its effectiveness in cutting reflections.

2. Deepening the Blue Sky

We’ve already seen that polarizers can help colors to look more rich by reducing reflections. Another common use of CLP’s is to increase contrast and saturation in a blue sky. Skies look more blue and clouds more detailed with the polarizer.

0W6A4487-Edit2-2

Without CLP

0W6A4487-Edit2-2-2

With CLP

However, the filter has some limitations in this area. If the sun is in front of or behind you, then you will not get the effect of the polarizer. The sun should be perpendicular to your camera lens… 90 degrees to your right or left. This limits the cases where you can use a polarizer to enhance the sky. Also, because wide-angle lenses cover a larger area of the sky, some of the sky will be 90 degrees perpendicular to your lens, but not all of it. This causes uneven polarization across the sky, as seen below.

0W6A4487-Edit-2

You can correct this somewhat in post-processing, but it takes work to get the sky looking reasonably acceptable. For this reason, it is better not to shoot too wide when using a polarizer to enhance the sky. By the way, when rotating the filter, don’t go too overboard on deepening skies, especially if the sky is already quite blue. You can turn nice blue skies way too dark.

3. Cutting Down Haze

CLP’s also help cut through haze in distant landscape elements. This is because haze is also reflective. In some cases, you may want to include at least some of the haze in your image, so use your own judgment on this.

4. Cutting Down Light Reaching the Sensor

Polarizers function similar to neutral density filters in that they cut down the light reaching the sensor, typically by about 1-2 stops. This makes slower shutter speeds possible. Depending on the situation, this can be completely neutral, a benefit, or a drawback for you. Either way, just use your solid neutral density filter instead if all you want is to slow down your shutter speed.

Photograph With Others

I recommend traveling and photographing with other photographers who are as committed as you to doing whatever it takes to get good pictures. There are quite a few images that would not be in my portfolio if I was not traveling with others. Here are some examples:

canyon,checkerboard mesa,evening,fall,landscape,north america,southwest,tree,twilight,united states,utah,zion national park

Twisted : Prints Available

A lone tree in front of a mountain valley at twilight.

The tree shot above was taken in a rocky area of Zion National Park that took a little bit of hiking up a rocky area to get to. Now there is some vigorous debate going on over who actually spotted the tree first. This is my blog, so the story you will hear is that I saw it first. One thing is for sure, though… I would not have gotten this shot if my friend Josh Merrill (who is basically fearless when it comes to heights) had not started climbing. I would definitely have talked myself out of this one.

cloudy,cottonwood,fall,landscape,morning,mountain,north america,peak,river,southwest,sunrise,tree,united states,utah,watchman,water body,zion national park

Storm Over The Watchman : Prints Available

Stormy skies moving in over The Watchman in Zion National Park.

Josh gets credit for the above shot also. You see, this is normally a sunset shot. Josh had done a little research late the night before and found an excellent shot from this same spot… but at sunrise. So, we changed our plans late the night before and went to this location at sunrise. We ended up with a very intense hail storm coming our way that made for a great picture. We started getting hit with ice about 30 seconds after this shot, but it was well worth it.

aurora,beach,borealis,eastern,europe,field,hill,hofn,iceland,klifatindur,mountain,northern lights,pond,pool,sand,south,southern,the northern lights

Aurora Over Iceland : Prints Available

The Northern Lights illuminating the sky over southeastern Iceland.

I traveled to Iceland with my friend Mirko Vecernik in September. The Northern Lights image above was taken during our 3rd middle of the night shoot and, in this case, we had a guy from the park hunting us down by flashlight. I’m quite sure I would have fled the scene and went to sleep if I was on my own.

bruarfoss,europe,iceland,southern,sunset,water body,waterfall

From the River : Prints Available

View from the river at Iceland’s Bruarfoss.

Another benefit of photographing with friends is that you can benefit from eachother’s knowledge and research. My friend Dusty Doddridge is the king of photography trip research and advised me to bring along fisherman’s boots for Bruarfoss waterfall in Iceland due to the cold temperature of the water. I purchased boots and dragged them all the way to Iceland just for this one shot. The water was so intensely cold that I would not have gotten this shot without the boots.

COLOR,ELEMENT,LANDFORM,LIGHT,LOCATION,beach,black,cape,cliffs,dyrholaey,europe,iceland,mirko,names,ocean,sand,sea stack,southern,sunset,water body,silhouette

Get the Picture : Prints Available

A photographer on an Iceland black sand at sunset.

On a final note, another good reason to shoot with friends is that you can use them as models, as was the case with Mirko here. And they work cheap!

Shooting Into the Sun

Sign up for my mailing list at the top of this page to receive regular updates!

I love shooting into the sun. It does sound a bit counterintuitive. Cameras don’t handle contrast as well as our eyes do, so skies can easily go white and shadows black in high contrast situations. But, with a little bit of technique in shooting and processing, you can get some cool images. So, embrace the contrast.

Here are some tips for shooting into the sun:

Tip #1: Shoot into low-angled sunlight. I shot the image below in Death Valley just as the sun was hitting the horizon. You’ll get better results with this very low-angled sunlight because it is warmer and less contrasty than mid-day sunlight. Twenty minutes earlier and this would have been a pretty lousy picture. The light would have been too contrasty resulting in white skies and washed out colors. The cool shadows on the dunes would be missing.

america,california,death valley,death valley national park,dune,dunes,evening,mesquite dunes,north america,sunset,united states,us,usa,west

Sunset Over Mesquite Dunes : Prints Available

Horizontal view of Death Valley’s Mesquite Dunes at the end of the day.

Tip #2: Create a sunstar. The images above and below each have a “sun star”. I posted an earlier blog on this, but basically you shoot with a very small aperture (such as f/22) using a wide-angle lens. This doesn’t work well with all lenses, but the Canon 16-35 f/2.8 works great. This doesn’t work well with mid-day or diffused sunlight.

beautiful,brilliant,europe,france,gordes,horizontal,southern,sunrise

First Light Over Gordes : Prints Available

Beautiful sunrise over the hilltop city of Gordes, France

Tip #3: Partially obscure the sun. Partially obscuring the sun works well in increasing a focus area for the sun’s intensity and also reducing the contrast a bit. For the image below, the sea stack partially obscured the sun, creating a nice glow.

beach,cloudy,coast,coastal,crashing,evening,north america,northwest,ocean,pacific northwest,pacific ocean,rialto beach,sea stack,shore,sunset,united states,vertical,washington,water body,wave

End of Day at Rialto Beach : Prints Available

A beautiful sunset on the shores of Rialto Beach

Tip #4: Use clouds as a diffuser. As a photographer, clouds are my best friend or worst enemy depending on the situation. In some cases, clouds will act as a nice diffuser which allow you to shoot into the sun. Notice the sun was higher in the sky, but the image still has the effect of low-angled light due to the diffusion of the sun.

asia,asian,boat,china,chinese,cormorant,environmental portait,evening,fisherman,fishing boat,guilin,hill,karst,karst mountains,landscape,li river,male,man,mountain,mountain range,people,portrait,range

Xingping Fisherman : Prints Available

A fisherman on the Li River at Xingping near Guilin taking a break.

Tip 5: Put the sun at the edge of the frame. This is a similar concept as partially obscuring the sun. The sun was half-in / half-out in the image below.

3,asia,china,gold,green,hill,horizontal,longji,longji rice terraces,longji viewpoint 3,longsheng,mountain,planting season,rice terrace,terrace,three,v

Sunset over the Terrace : Prints Available

Sunset at viewpoint 3 in China’s rice terraces

Tip 6: Get the exposure right! Because of the high level of contrast, it is very important to get the exposure right. In most situations, you don’t want to blow the highlights, which is when some of the pixels go white and lose all detail. It may be okay to have part of the image blown out, such as the brightest part of the sun, but avoid blowing out parts of the sky. You also usually don’t want the image to have a lot of black shadows with no shadow detail, unless you are creating a silhouette. Tip 7 is one solution to this.

Tip 7: Shoot multiple exposures if necessary. In these high contrast situations, I’ll often “bracket”, which means shooting the same shot with different exposures. I’ll do an underexposed shot to make sure I get the details in the sky, a normal exposure for the mid-tones, and an overexposed shot for shadow details. I usually don’t use all the exposures, but sometimes use two and blend them in Photoshop. If your highlights are getting blown and your shadows are black, then you should bracket. Some photographers use graduated neutral density filters as a way of reducing the contrast in the image.

Processing. The processing of high contrast images is another topic for another day. But, generally speaking, you will want to get your skies darker and your shadows lighter, while still having a nice amount of contrast in your image. This can involve blending your bracketed images, multi-processing the image in RAW, using the various exposure adjustment sliders, making adjustments in Photoshop, etc.

Compelling Shapes in Silhouette Images

Silhouette images can be pretty cool. This is because the high level of contrast between lights and darks, often combined with saturated colors, makes an immediate impact on the viewer. However, this visual impact makes it easy to let a mediocre image slip into your portfolio.

For this reason, I hold my silhouette images to a higher standard when it comes to the shape of the subject. The subject must have an interesting graphic shape, such as in the picture below:

2,Xia Pu,XiaPu,Xiao Hao,XiaoHao,abstract,asia,asian,beach,beautiful,bucket,buckets,china,chinese,evening,female,gold,golden,lady,looking down,sand,silhouette,sun,sunset,texture,two,walking,warmth,woma

Twins : Prints Available

Two women in silhouette on beach outside XiaPu, China

This image works well because the dancer (a.k.a. my wife) knows how to pose well.

agility,america,ballet,chicago,dance,dancer,exercise,flexibility,horizontal,il,illinois,lake,lake michigan,midwest,morning,north america,silhouette,sunrise,united states,us,usa,yoga

First Light : Prints Available

Dancer exercising at sunrise on Lake Michigan

Depending on your shutter speed, you will most likely need to use a tripod and also ensure your subject is completely still. None of the edges of the silhouette should be blurred, unless you are blurring for effect.

america,beautiful,botanic gardens,female,fountain,horizontal,il,illinois,lady,midwest,north america,pond,sunset,united states,us,usa,woman

The Fountain : Prints Available

Elegant woman watching a fountain during a brilliant sunset

Also, in many cases, you don’t want the silhouette to go completely dark. Including a little detail in the shadows often works better than having a completely black shape. In the image below, I brought out some of the details of the lighthouse in post-processing.

america,beautiful,building,fisherman,fishing,lighthouse,michigan,midwest,north america,saint joseph,silhouette,st. joseph,sunset,united states,us,usa,vertical

All is Well : Prints Available

Silhouette of two men fishing off a lighthouse pier during sunset

Foggy Lenses

Photographers have a lot of pet peeves. For those of you unfamiliar with the expression, a “pet peeve” is something specific that is particularly annoying to you. The list of pet peeves among photographers is so long that you could literally write a doctoral dissertation on the subject. But, generally, anything that can ruin a picture is included. Without a doubt, “foggy lenses” makes the top ten list. This is because it takes quite awhile for lenses to un-fog in humid conditions…. sometimes 20 minutes or more.

Lenses become foggy when you go from a cool environment (such as an air-conditioned vehicle) to a hot, humid environment. This scenario is not uncommon in photo shoots where you are jumping out of a vehicle to shoot a scene. Lenses can also fog up in very wet or humid environments, even if the camera had already adjusted to the outdoor temperature. This is common when you are shooting in the rain or next to a waterfall.

beautiful,columbia river gorge,north america,northwest,oregon,pacific northwest,ponytail falls,rock,stream,united states,vertical,water body,waterfall

Fog Over Ponytail Falls : Prints Available

Fog creeps through the trees overlooking Ponytail Falls

Here are a few quick tips for minimizing the risk of ruining part or all of a shoot due to a foggy lens:

1. Shut off the air-conditioning prior to the shoot. When on the way to photograph in a warm area, I try to get the environment in the car similar to the environment outside. Opening the window and dealing with some heat or humidity is well worth it.

2. Control the lens temperature with your camera bag’s zipper. If I am stuck in a cool environment and have no control over it, I’ll leave my camera bag zipped. However, if I’ve left an air-conditioned or cool temperature and am now in the car and can keep the car warm, I’ll begin to acclimate my camera and lenses by unzipping the camera bag slightly.

3. Use the air blower and lens cloth. If your lens is already fogging up, then using your air blower and lens cloth between shots to keep the lens as dry as possible is your best option.

cloudy,coast,coastal,north america,northwest,ocean,oceanside,oregon,pacific northwest,pacific ocean,sea stack,united states,vertical,water body,wave

Wave Crash at Oceanside : Prints Available

A wave crashing on the rocky shore of Oceanside, Oregon is frozen in time

Sometimes, you are in a situation where the environment is so wet and humid that these techniques don’t solve the problem. During my recent visit to Iceland, I was photographing waterfalls close up and was getting pummeled with spray from the falls almost constantly. I was battling both water drops and fog on the lens. In those cases, you just do your best to keep the camera dry between shots and wipe the lens after each shot. Using this technique, I was able to get the pictures I wanted, but I did end up with moisture in the lens that lasted until the following day. Another photographer was photographing the same waterfall and ended up with actual water in his lens because his camera and lens did not have sufficient weather sealing. So, you need to be extra careful if you do not have a higher end camera and lens with good sealing.

Coastline Moving Water Images

I love coastline images that include moving water. Although there are many ways to incorporate water into an image, I especially like combining blurred streaks of water bubbles with an interesting distant subject. Here is an example:

beach,cloudy,coast,coastal,crashing,evening,north america,northwest,ocean,pacific northwest,pacific ocean,rialto beach,sea stack,shore,united states,vertical,washington,water body,wave

Waves on Rialto Beach : Prints Available

Retreating water in front of sea stacks on Washington’s Rialto Beach

The above image works well because the sea stack makes a great subject out in the water. This is not always easy to find, which is why so many landscape photographers flock to the Pacific Northwest. If you are lucky enough to have access to this type of scenery, here is how to take these pictures:

You’ll Need…

  • A sturdy tripod. This is especially important because the camera needs to stay still during a relatively long exposure while standing in moving water.
  • A remote shutter trigger. This will help you keep your eyes on the waves to get your timing right, as well as minimize camera shake.
  • Depending on the lighting, you will most likely need a solid neutral density filter, such as a 4-stop or even a 10-stop for bright conditions.
  • A wide to ultra-wide lens (probably in the 14-24 range).
beach,cloudy,coast,coastal,crashing,evening,north america,northwest,ocean,pacific northwest,pacific ocean,rialto beach,sea stack,shore,sunset,united states,vertical,washington,water body,wave

End of Day at Rialto Beach : Prints Available

A beautiful sunset on the shores of Rialto Beach

Composing the Image…

  • Where you stand and what focal length you use will be driven by getting the water streaks composed properly in the foreground and the subject as an important part of the image. The picture above is an example of a good balance between foreground and distant subject.
  • You want to position yourself in a spot where the water passes you as the waves go in and out but is relatively shallow or dry after the water moves out. Yes, this means your feet and probably legs will get wet.
  • One good compositional technique is to use the water streaks as leading lines to the subject, such as in the image below.
beach,clouds,cloudy,coast,coastal,crashing,evening,horizontal,north america,northwest,ocean,pacific northwest,pacific ocea

Rocks on Ruby Beach : Prints Available

Water retreating between rocks on the shores of Ruby Beach

Your Settings…

  • Set your camera to manual or shutter priority
  • Set ISO to 100
  • For starters, set your shutter speed to between 1/4 and 2 seconds. You can then adjust later based on what looks good.
  • You then have to arrive at a desired aperture. I generally choose between f/18 or f/20 so that the distant subject as well as the water streaks are in focus. Even though the foreground water is blurred, you still want it to be in focus.
  • If you are still overexposing the image, you can then bring in the neutral density filter(s) and re-adjust to your final aperture to get a proper exposure.
cloudy,coast,coastal,north america,northwest,ocean,oceanside,oregon,pacific northwest,pacific ocean,sea stack,sunset,united states,vertical,water body,wave

Oceanside Sea Stacks at Sunset : Prints Available

Beautiful sunset on the Pacific at Oceanside

Timing the waves…

  • You want to shoot as the water is retreating back into the ocean or lake. When the water retreats, there are often bubbles which help the water streaks look more pronounced. You will have to work with the timing of when to trip the shutter, but I generally wait until the water is retreating around the tripod.
  • Keep checking what your images look like and make adjustments to your settings and timing.

Lastly, take a lot of pictures… each one will be different, so it is best to have more options to choose from.

Seeking Out Great Subjects

One of the best lessons I learned early on from photographer Jim Zuckerman is that great subjects form the foundation for great pictures. A great subject can make the difference between a snapshot and a work of art. Yes, there are some excellent photos out there of very ordinary things. But, quite often, the strength of your photo depends on the strength of your subject.

Don’t avoid taking pictures of ordinary things. But, take the extra step to seek out great subjects. Below are some examples of images where a great subject made all the difference in the final result.

agalychnis callidryas,amphibian,colorful,flower,frog,frog and reptile,frog reptile,gaudy,heliconia,horizontal,jim zuckerman,night,red,red-eyed,red-eyed tree

Red-Eyed : Prints Available

Close-up of colorful Red-Eyed Tree Frog

The picture above of the Red-Eyed-Tree-Frog is a compelling image because the frog is super cool. Put an ordinary frog on the same Heliconia flower and the picture is probably a tosser.

asia,asian,china,chinese,da zhai,da zhai terrace fields,dazhai,elderly,environmental portait,hat,longji,longji rice terraces,longsheng,male,man,old,older,people,portrait,smoking,standing,terraces,tian

One Eye Closed : Prints Available

Chinese man from the Longji area takes a break outside his house.

I’ve seen great pictures of ordinary people. However, there are people out there that are especially unique and compelling looking. I like to take pictures of older people that have been around the block a few times because they often make for amazing subjects. The older Chinese man in the picture above is no exception.

america,autumn,colors,fall,foliage,horizontal,leaf,leaves,left fork,left fork at north creek,left fork of north creek,north america,southwest,subway,swirling,the subway,united states,us,usa,utah,zion

Leaves Swirl at the Subway : Prints Available

Gold colors from the sand-filled pools at the Subway

The above picture is of a place known as “The Subway”. It is located in Zion National Park and involves a long hike, scrambling over and between rocks and across rivers. But, the place is otherworldly and resulted in a great picture that I’m glad is part of my portfolio.

africa,african,dead tree,deadvlei,desert,forest,horizontal,namibia,namibian,sand,tree,woods

End of Day at Deadvlei : Prints Available

Evening light striking the orange dunes at Deadvlei

Of course, it is not always easy (or cheap) to get to far away places. But getting to places that most people haven’t been to adds to the impact of your photos. Deadvlei, pictured above, is such a place that leaves those that haven’t been there asking questions about what it is and where it is.

Transitioning From Cool to Warm

It is March here in Chicago and most people are a little tired of cold weather and are waiting for Spring. So, it is a fitting blog topic to talk about a cool-to-warm transition in a photography context. I’ve touched on this briefly in a past blog, but you have probably forgotten about that if you even read it.

Transition can give life and dimension to an image. There are a few types of transitions possible, one of which is moving from a warm color(s) to a cool color(s) or vice versa. As you know from a previous blog, blue is a great example of a cool color, while yellow is a great example of a warm color. Moving from blue to yellow within your image creates transition. This especially works in landscape images, but can be effective in other types of pictures as well. Here are some examples…

asia,asian,boat,dock,dock worker,environmental portait,indonesia,indonesian,jakarta,java,portrait,ship,smoking,sunda kelapa,west java

Taking a Break : Prints Available

Indonesian dock worker taking a break behind a shipping container

The image above of an Indonesian dock worker starts with warm on the left and moves to a cool color in the upper right corner.

america,california,death valley,death valley national park,dune,dunes,evening,mesquite dunes,north america,sunset,united states,us,usa,west

Sunset Over Mesquite Dunes : Prints Available

Horizontal view of Death Valley’s Mesquite Dunes at the end of the day.

This picture of the Mesquite Dunes transitions from warm sand and sun to a cool looking sky in the upper right corner.

beautiful,columbia river gorge,gorton creek,horizontal,north america,northwest,oregon,pacific northwest,pacific northwest portfolio,rock,rushing,s

Gorton Creek : Prints Available

Lower Gorton Creek in the Colombia River Gorge

The above picture of Gorton Creek in Oregon’s Columbia River Gorge does the opposite… it moves from a cool foreground to a warmer background.

In some cases, the transition can occur naturally in your scene. In other cases, you can accomplish this in post-processing. You can do this in a variety of ways in Photoshop, but one way is to add a solid color layer with a warm or cool color and then add a gradient mask to make the transition. Be sure to reduce the opacity of your layer. Or, warm or cool photo filters can be used with the gradient mask to make the transition.